Camel yoga pose to help you lose weight

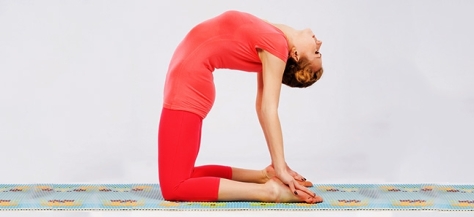
Ustrasana-Camel-poseThe Camel Pose or Ustrasana is the best yoga pose to reduce weight because it targets the tummy, back and thighs. Camel pose also helps for strengthening the back muscles, opening up the chest and lungs, improving the flexibility of the chest, abdomen and neck.
How to do Camel Pose (Ustrasana)

  • Kneel on the yoga mat and place your hands on the hips.
  • Your knees should be in line with the shoulders and the sole of your feet should be facing the ceiling.
  • As you inhale, draw in your tail-bone towards the pubis as if being pulled from the navel.
  • Simultaneously, arch your back and slide your palms over your feet till the arms are straight.
  • Do not strain or flex your neck but keep it in a neutral position.
  • Stay in this posture for a couple of breaths.
  • Breathe out and slowly come back to the initial pose. Withdraw your hands and bring them back to your hips as you straighten up.
  • Benefits of the Camel Pose (Ustrasana)

    • Improves digestion
    • Stretches and opens the front of the body. It also strengthens the back and shoulders
    • Relieves the body of lower back ache
    • Improves flexibility of the spine and also improves posture
    • Helps overcome menstrual discomfort

Padmasana for curing headache

padmasanaPadmasana helps you relax and clear your mind of tensions. The Padmasana yoga pose relaxes the mind and alleviates headache.
Padmasana or Lotus pose is a cross-legged yoga posture which helps deepen meditation by calming the mind and alleviating various physical ailments. A regular practice of this posture aids in overall blossoming of the practitioner, just like a lotus; and hence the name Padmasana.

How to do Lotus Pose (Padmasana):

  • Sit on the floor or on a mat with legs stretched out in front of you while keeping the spine erect.
  • Bend the right knee and place it on the left thigh. Make sure that the sole of the feet point upward and the heel is close to the abdomen.
  • Now, repeat the same step with the other leg.
  • With both the legs crossed and feet placed on opposite thighs, place your hands on the knees in mudra position.
  • Keep the head straight and spine erect.
  • Hold and continue with gentle long breaths in and out.

Practising these simple yoga postures will lessen the impact of a migraine attack and may eventually stop them permanently. So, roll out the yoga mat, repose for some time everyday and shut migraine out of your life for good!

How to reduce weight with yoga

bow-pose

Tips for weight loss

  • Weight loss is all about 80% of eating habits and 20% of working out. Aim to lose both body fat as well as overall weight.
  • Be regular and more often in your yoga practices.
  • Keep the metabolism active by having 5-6 small meals every 2-3 hours. This will also help you in keeping your pseudo hunger at bay.
  • Be passionate about your yoga workout. For the passion will help you to go deeper into your yoga practices.
  • Be 100% with the food on the dinner table. Avoid watching T.V or chatting over the phone while eating and have a balanced diet.

Best yoga asanas to reduce weight:

  • Surya Namaskar: 12 yoga poses combined to form a sequence called Surya Namaskar. It is the best yoga has to offer as far as the poses are concerned. It works on the whole body especially on the big muscle group. A beginner can start with a few rounds of it and gradually increase the no. of rounds. It helps to shred the weight and also known as king of the asanas.
  • Warrior Pose: The warrior pose strengthens the hamstrings, thighs, legs and ankles as the body weight is transferred on the thighs with the forward bend. It helps to stimulate abdominal organs which can help increase the stamina. Stamina built up can help you to keep going over a longer period of time.
  • Cobra Pose: This is the pose which works on the chest and the back region. The heart Cobra Poseopening pose helps to take deep breaths resulting in more oxygenated blood being pumped to different parts of the body. The oxygenated blood helps to burn the fat. Helps in toning the buttocks too.
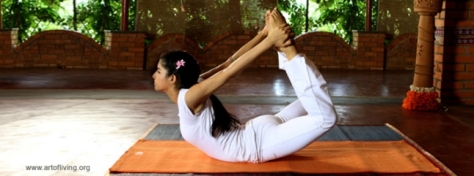
  • Bow Pose:This is more of an advanced yoga pose but Bow Pose: not only helps in burning the fat but also helps in toning of arms and legs. One can feel the stretch in the abdominal region taking this pose. The stretch helps to loosen up the fat in the region. Continuous practicing of this asana further melts the loosen belly fat.
  • Side Bends: It’s as important to work on muscles in the stomach region as often as working on other muscles group. After a certain age the body stops to grow and the fat starts accumulating in the stomach region. Side bends helps to melt those love handles. These bends might not help to burn a lot of calories but will be instrumental in inch loss. Don’t be surprised if you need to wear belts as your pants will be loose the next time.

Paschimottanasana to reduce belly fat

Paschimottanasana to reduce belly fatPaschimottanasana is definitely a good exercise for those who want to get rid of belly fats.

How to do Seated Forward bend yoga pose (Paschimottanasana)
• Sit on the floor with the legs stretched out, feet together and hands on the knees.
• Relax the whole body.
• Slowly bend forward from the hips, sliding the hands down the legs. Try to grasp the big toes with the fingers and thumbs. If this is not possible, hold the ankles or any part of the legs that can be reached comfortably.
• Keeping the legs straight and using the arm muscles, begin to bend the elbows and gently bring the trunk down towards the legs, maintaining a firm grip on the feet or legs.
• Make a gentle effort to touch the forehead with the knees. Do not strain.
• Hold the position for as long as is comfortable and relax as you breathe.
• Slowly return back up sliding hands on the legs.

Benefits:
1. This asana increases flexibility in the hip joints.
2. It tones and massages the entire abdominal and pelvic region, including the liver, pancreas, spleen, kidneys and adrenal glands. Paschimottanasana helps for reduce weight.
3. It stimulates circulation to the nerves and muscles of the spine.

Vakrasana (sitting spinal twist) yoga to get relieved from back pain

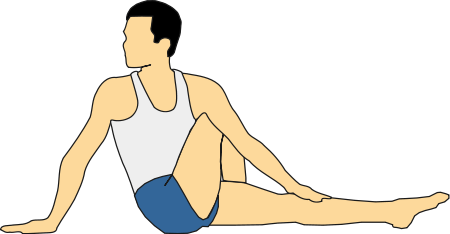
VakrasanaThe twist imposed on the spine makes the spinal column more flexible and stimulates the spinal nerves. It also has a strong influence on the abdominal muscles, alternately stretching and compressing them, as the body twists from one direction to the other.

Steps to do Vakrasana:
• Sit with the legs outstretched.
• Sit up with the legs stretched straight in front of you, keeping the feet together and the spine erect.
• Place the left hand on the left knee; right hand behind you.
• Twist to the right and look over the right shoulder.
• Hold.
• Breathing out, come back to the front.
• Repeat on the other side.
• Breathing out, come back to the front and relax.

Benefits:
1. Stretches the spine, loosens the vertebrae and tones the nerves.
2. Vakrasana relieves back pain, neck pain, some forms of sciatica.
3. A good asana for beginners, preparing the back for the more difficult spinal twists

Paschimottanasana for controlling anger

paschimottanasana

Paschimottanasana calms the brain and helps relieve stress and depression and Paschimottanasana also helps to control anger.
How to do Seated Forward bend yoga pose (Paschimottanasana)
• Sit up with the legs stretched out straight in front of you, keeping the spine erect and toes flexed toward you.
• Breathing in, raise both arms above your head and stretch up.
• Breathing out, bend forward from the hip joints, chin moving toward the toes. Keep the spine erect focusing on moving forwards towards the toes, rather than down towards the knees.
• Place your hands on your legs, wherever they reach, without forcing. If you can, take hold of your toes and pull on them to help you go forward.
• Breathing in, lift your head slightly and lengthen your spine.
• Breathing out, gently move the navel towards the knees.
• Repeat this movement two or three times.
• Drop your head down and breathe deeply for 20-60 seconds.
• Stretch the arms out in front of you.
• Breathing in, with the strength of your arms, come back up to the sitting position.
• Breathe out and lower the arms.

Salabhasana to strengthen your back

salabhasana
Salabhasana strengthens the back and improves flexibility in the spinal muscles.The abdominal muscles become stronger, improving digestion. Stiffness is reduced in the neck and shoulders.

Step by Step
• Lie face down on the floor with the arms beside the trunk, feet together, knees straight and the toes stretching back.
• Turn the palms upward. Stretch the arms and raise them so that the hands are parallel to the floor.
• Press the sacrum downward and raise the head, chest and legs as high as possible taking care there is no back pain.
• Extend the trunk forward, the legs and arms backward and lift the chest.
• Balance on the lower abdomen, look straight ahead and breathe normally. Hold the pose for 20-30 seconds and then release and lower the chest, head and legs.

Focus
In everyday life we are continually bending forwards, but have little reason to bend backwards. Back bends help to extend the heart muscles, stretch the front side of the lungs and maintain flexibility in the respiratory muscles, thereby increasing lung capacity. They are also useful for nourishing and toning the abdominal organs and stimulating the adrenal glands.

Modification
Don’t raise the arms and legs too high, as this will cause pain in the lower backstretch the shoulders back, keeping the arms parallel. Keep the legs together and the knees straight.

If it is difficult to do the pose with the feet together, place a foam block between the feet, press the inner edges of the feet into the block and lift the legs.

In order to open the chest more, and increase the extension in the arms, put a wooden block on the palm of each hand. Imagine the blocks are heavy weights, and without actually lifting the hands any higher, push the palms into the blocks as if trying to lift them.

Tadasana for knee pain

tadasanaTadasana yoga will teach you proper alignment that may help ward off new knee injuries and help you become aware of the muscles you need to engage to protect the knee.

Step by Step:
Stand with your feet together and the bases of your big toes touching, heels slightly apart (so that your second toes are parallel) and arms by the sides. Rock back and forth and side to side. Gradually reduce this swaying to a standstill, with your weight balanced evenly on the feet.
Firm your thigh muscles and lift the knee caps, without hardening your lower belly. Lift the inner ankles to strengthen the inner arches. Turn the upper thighs slightly inward and lengthen your tailbone toward the floor.

Press your shoulder blades into your back, then widen them across and release them down your back. Without pushing your lower front ribs forward, lift the top of your sternum straight toward the ceiling. Widen your collarbones. Hang your arms beside the torso.
Balance the crown of your head directly over the center of your pelvis, with the underside of your chin parallel to the floor.

Tadasana is usually the starting position for all the standing poses. But it’s useful to practice Tadasana as a pose in itself. Stay in the pose for 30 seconds to 1 minute, breathing easily. Practise 5 rounds. At first it may be difficult to maintain balance but with practise it becomes easier.

This asana improves posture and develops balance. It strengthens thighs, knees, and ankles, firms abdomen and buttocks, Relieves sciatica, Reduces flat feet.

Setu Bandhasana for knee pain

The Bridge pose helps strengthen muscles in the knee joint and is also helpful for those suffering from osteoporosis. It also calms the brain and reduces anxiety and stress in the body.

Setu Bandhasana for knee pain

How to do Bridge Pose (Setu Bandhasana)

  1. To begin, lie on your back.
  2. Fold your knees and keep your feet hip distance apart on the floor, 10-12 inches from your pelvis, with knees and ankles in a straight line.
  3. Keep your arms beside your body, palms facing down.
  4. Inhaling, slowly lift your lower back, middle back and upper back off the floor; gently roll in the shoulders; touch the chest to the chin without bringing the chin down, supporting your weight with your shoulders, arms and feet. Feel your bottom firm up in this pose. Both the thighs are parallel to each other and to the floor.
  5. If you wish, you could interlace the fingers and push the hands on the floor to lift the torso a little more up, or you could support your back with your palms.
  6. Keep breathing easily.
  7. Hold the posture for a minute or two and exhale as you gently release the pose.

Simple Yoga asanas for back pain

Yoga asanas strengthen your back and release tension and stiffness from the shoulder area. By practising the asanas on a consistant basis, your back pain will be cured easily .

Camel Pose:

Ustrasana-Camel-pose

  1. First come to a kneeling position with hands on the waist.
  2. Gently bend backward, moving the pelvis forward and lifting the chest upward, keep the head up.
  3. Release the hands and one by one place the hands on the soles.
  4. Lift the upper torso a little higher and breathe deeply.
  5. To come out of the posture, release the hands, sit down on the heels and rest in child’s pose.

Benefits: Improves the respiratory function, relieves tension and stiffness from shoulder area, makes the movement of the bones smoother.

Sitting Half Spinal Twists:

Ardha-Matsyendrasana-Half-Spinal-Twist

  1. Sit on the floor. Bend left leg to place left knee on the floor and left heel against the right buttock.
  2. Place right foot on outside the left thigh.
  3. Sitting straight up place the right hand on the floor behind you. Twist your torso to the right, and press your left arm against the outside of the right leg to grasp right foot with left hand. If you have difficulty reaching the right foot, just press the left elbow against right knee, hand pointing upward in the air.
  4. Twist first from the waist, and then twist the rib cage and finally the shoulders.
  5. Look over your right shoulder. Keeps the right hip pressing down to the floor. Keep the spine straight. Relax both shoulders. Keep breathing. Hold.
  6. Repeat on the other side.


Benefits: Makes the spine supple, removes stiffness from the shoulders and neck, massages and tones abdominal organs. in the abdominal area and stimulates the stomach, colon, kidneys, liver, spleen and gall bladder.